What are Events
Events are things like clicking, mouse entering or hovering over something, or the user trying something in a search bar.
You can use JavaScript to listen to events and act based on the user's actions.
<!DOCTYPE html>
<html lang="en">
<head>
    <title>Dom</title>
    <script type="text/javascript" src="script.js" defer></script>
</head>
<body>
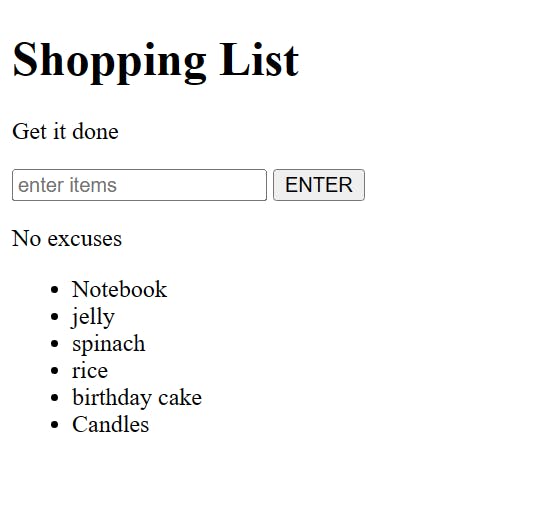
<h1>Shopping List</h1>
<p id ="first">Get it done</p>
<input id="userinput" type="text" placeholder="enter items">
<button id="enter">ENTER</button>
<p class="second">No excuses</p>
<ul>
<li random="23">Notebook</li>
<li>jelly</li>
<li>spinach</li>
<li>rice</li>
<li>birthday cake</li>
<li>Candles</li>
</ul>
</body>
</html>
Mouse Event
- The
MouseEventinterface represents events that occur due to the user interacting with a pointing device (such as a mouse). Common events using this interface includeclick,dblclick,mouseup,mousedown.
Event Listener
It is a method we can use and it accepts two parameters
The first one is the event. In our case, we're listening to the click event.
And the second parameter is the function or what we want to do based on the click.
→ click
var button = document.getElementsByTagName("button")[0];
document.addEventListener("click",function(){
      console.log("clicked");
});
→ MouseEnter
var button = document.getElementsByTagName("button")[0];
document.addEventListener("mouseenter",function(){
      console.log("clicked");
});
→ MouseLeave
var button = document.getElementsByTagName("button")[0];
document.addEventListener("mouseleave",function(){
      console.log("clicked");
});
Document.createElement()
In an HTML document, the
document.createElement()method creates the HTML element specified by tagName or anHTMLUnknowElementif tagName isn't recognized.//HTML <input id="userinput" type="text" placeholder="enter items"> <button id="enter">ENTER</button> //js var button = document.getElementById("enter"); var input = document.getElementById("userinput"); button.addEventListener("click",function(){ var li = document.createElement("li"); } )
Node.appendChild()
The
appendChild()method of thenodeinterface adds a node to the end of the list of children of a specified parent node. If the given child is a reference to an existing node in the document,appendChild()moves it from its current position to the new position.
    var button = document.getElementById("enter");
    var input = document.getElementById("userinput");

    button.addEventListener("click",function(){
        var li = document.createElement("li");

    }
    )
What we've done is we've created a
lithat says, Oats. But this is not attached to anything, it just lives in our program, but we need to attach it to the unordered list. And the way we do that is, well, we grab the unordered list and then append it to it.var button = document.getElementById("enter"); var input = document.getElementById("userinput"); var ul = document.querySelector("ul"); button.addEventListener("click",function(){ var li = document.createElement("li"); li.appendChild(document.createTextNode("Oats")); ul.appendChild(li); } )RECAP:
We can create an element, so we just give it the tag that we want to create.
If you want to display something, it needs to have some sort of text inside it. And the way that the document object model works is that to create a text, you do
createTextNodeand put whatever you want inside of it. Now we've created thisli, but we need to attach it to something that is part of the actual viewright now.
In our case, we want to attach it to the unordered list and use an
appendChild, which adds it as a child.
But ideally, we can put something that we enter in here, not just static Oats.
So how can we do that?
We have the input already grabbed. And the way we get the value from an input is
input.valueif the input is empty its skips
    var button = document.getElementById("enter");
    var input = document.getElementById("userinput");
    var ul = document.querySelector("ul");

    button.addEventListener("click",function(){
        if(input.value.length >0){
        var li = document.createElement("li");
         li.appendChild(document.createTextNode(input.value));
         ul.appendChild(li);
        }
    })
To get the input value empty, an empty string
var button = document.getElementById("enter");
var input = document.getElementById("userinput");
var ul = document.querySelector("ul");

button.addEventListener("click",function(){
    if(input.value.length >0){
    var li = document.createElement("li");
     li.appendChild(document.createTextNode(input.value));
     ul.appendChild(li);
     input.value = "";
    }
})
KeyBoard Events
KeyboardEventobjects describe a user interaction with the keyboard; each event describes a single interaction between the user and a key (or combination of a key with modifier keys) on the keyboard. The event type (keydown,keypress, orkeyup) identifies what kind of keyboard activity occurred.The
keypressevent is fired when a key that produces a character value is pressed down.Use key press event instead of click event for input
Listen for the
keypressevent to detect which key was typedEach key is associated with a character code number
Use a website Javascript Char Codes (Key Codes) - Cambia Research to check the character code of a specific key
In this case, listening for the character
code 13(Enter key)
input.addEventListener("keypres",function(){
    if (input.value.length>0){
    var li = document.createElement("li");
     li.appendChild(document.createTextNode(input.value));
      ul.appendChild(li);
      input.value ="";
    }
})
event.which
In JavaScript, "event.which" is a property of the event object that allows you to access the character code of the key that was pressed during a key press event.
When a key press event occurs, the event object is automatically passed to the event listener function as an argument. You can access the character code of the pressed key using "event.which" or "event.keyCode" property.
input.addEventListener("keypress",function(event){
    console.log(event);
})
//lets say you put k in input and press enter check console and notice
//in console you have bunch of information but check keycode and which both of them 107
key: "k"
keyCode: 107
which: 107
// Enter key
key: "Enter"
keyCode: 13
which: 13
Every time an event listener is added, a function is called
The function receives a parameter automatically, which is the event that triggered the listener
The event can be named "e", "event", or any other preferred name
When a user presses a key, it triggers an event
The function associated with the key press event receives the event as a parameter
The event describes what happened during the key press event
    input.addEventListener("keypress",function(event){
        if (input.value.length>0 && event.keyCode === 13){
            var li = document.createElement("li");
            li.appendChild(document.createTextNode(input.value));
            ul.appendChild(li);
            input.value ="";
        }
    });
keyCode property
keyCodeproperty is deprecated and is not recommended to be used anymore. Instead, you can use theevent.keyproperty to determine which key was pressed during a key press event.The
event.keyproperty returns the string value of the key that was pressed. For example, if the user pressed the Enter key, theevent.keyvalue would be "Enter".Here's an example code that uses
event.keyinstead ofevent.keyCode:input.addEventListener("keypress", function(event) { if (input.value.length > 0 && event.key === "Enter") { var li = document.createElement("li"); li.appendChild(document.createTextNode(input.value)); ul.appendChild(li); input.value = ""; } }); // In this example, the if statement checks if the event.key value is equal to "Enter", which represents the Enter key. If the condition is true, then the code inside the if statement will execute.
event.which and event.code
event.whichandevent.codeare two other properties that can be used to determine which key was pressed during a key press event.event.whichis similar toevent.keyCodeand returns the Unicode value of the key that was pressed.event.codereturns a string that represents the physical location of the key on the keyboard, regardless of the character that it produces when pressed. For example, the "KeyA" code represents the A key on the keyboard, regardless of whether the Shift key is pressed or not.Here's an example code that uses
event.whichandevent.code:
input.addEventListener("keypress", function(event) {
  if (input.value.length > 0 && (event.which === 13 || event.code === "Enter")) {
    var li = document.createElement("li");
    li.appendChild(document.createTextNode(input.value));
    ul.appendChild(li);
    input.value = "";
  }
});
- In this example, the
ifstatement checks if theevent.whichvalue is equal to 13, which represents the Enter key, or if theevent.codevalue is equal to "Enter", which also represents the Enter key. If the condition is true, then the code inside the if statement will execute.
Ordinary todo list
var button = document.getElementById("enter");
var input = document.getElementById("userinput");
var ul = document.querySelector("ul");

button.addEventListener("click",function(){
    if (input.value.length>0){
    var li = document.createElement("li");
     li.appendChild(document.createTextNode(input.value));
      ul.appendChild(li);
      input.value ="";
    }
})
input.addEventListener("keypress", function(event) {
  if (input.value.length > 0 && event.key === "Enter") {
    var li = document.createElement("li");
    li.appendChild(document.createTextNode(input.value));
    ul.appendChild(li);
    input.value = "";
  }
});
Refactoring the code
var button = document.getElementById("enter");
var input = document.getElementById("userinput");
var ul = document.querySelector("ul");

function inputLength() {
    return input.value.length;
}

function createListElement(){
    var li = document.createElement("li");
    li.appendChild(document.createTextNode(input.value));
     ul.appendChild(li);
     input.value ="";
   }

function addListAfterClick(){
    if (input.value.length>0){
        createListElement();
    }
}

function addListAfterkeyPress(event){
    if (input.value.length>0 && event.keyCode === 13){
        createListElement();
}
}
button.addEventListener("click",addListAfterClick);
input.addEventListener("keypress",addListAfterkeyPress);
At the beginning of the script, we create variables for the button, input, and the unordered list and store them in these variables.
We declare a bunch of functions, but they are not run immediately.
At the bottom of the script, we add event listeners for the button click and the input key press. This means that when the user clicks the button or presses a key in the input, the corresponding function will run.
When the button is clicked, the function checks if the input value length is greater than 0, and if it is, it creates a new list item element and appends it to the unordered list.
When a key is pressed in the input, the function checks if the input value length is greater than 0 and if the key pressed was the Enter key. If both conditions are true, it creates a new list item element and appends it to the unordered list.
Callback Functions
Event listener syntax :
    button.addEventListener("click", addListAfterClick);
    input.addEventListener("keypress", addListAfterKeypress);
You didn't see the function being called like this as you may have expected:
    button.addEventListener("click", addListAfterClick());
    input.addEventListener("keypress", addListAfterKeypress(event));
This is something called a callback function. When that line of javascript runs, we don't want the addListAfterClick function to run because we are just adding the event listener now to wait for click or keypress. We want to let it know though that we want this action to happen when a click happens. So the function now automatically gets run (gets added the ()) every time the click happens. So we are passing a reference to the function without running it.
Developer Fundamentals
- Minimizing DOM manipulation and events is a crucial concept in building fast and efficient web applications. The excessive use of innerHTML can cause performance problems by forcing the browser to re-parse and re-render the entire DOM tree. This can lead to a slow and unresponsive user experience, especially when dealing with large amounts of data. To avoid this, it's important to use the best methods available to minimize the amount of DOM manipulation and events. Fortunately, tools like React were created precisely for this purpose, making it easier for developers to build fast and responsive web applications.
